Kubernetes Deployment (IONOS)
Deploy the backend and Streamlit frontend to IONOS Managed Kubernetes. Images are hosted in IONOS Container Registry and rollouts are triggered by GitHub Actions tags. Each step includes a quick verification command.
Scope
- Cluster: IONOS Managed Kubernetes
- Registry: IONOS Container Registry (
*.cr.de-fra.ionos.com)- CI/CD: GitHub Actions (triggered by semantic tags like
0.1.5)- App:
backend(FastAPI) +streamlitfrontend- Namespace:
default
0) Prerequisites
Create or sign in to your IONOS Cloud account: https://dcd.ionos.com/
Install the CLI tools on macOS or Windows:
macOS (Homebrew)
brew install kubernetes-cli
brew tap ionos-cloud/homebrew-ionos-cloud
brew install ionosctl
Windows
# kubectl via winget (PowerShell as Admin)
winget install Kubernetes.kubectl

# ionosctl: download Windows release and add ionosctl.exe to PATH
# See: https://github.com/ionos-cloud/ionosctl/releases
Quick sanity:
kubectl version --client
ionosctl version
1) Access & Secrets You Need (before you begin)
You need three independent things ready:
- Kubeconfig (from IONOS UI) — for both local kubectl and CI
- IONOS Container Registry credentials — a registry user, for example
chatbot, and a generated access token - Runtime API keys used by the app (created as a Kubernetes Secret):
- IONOS_API_KEY
- TAVILY_API_KEY
- STUDIO_API_KEY (if using IONOS Studio fine-tuned models)
- STUDIO_ORG_ID (if using IONOS Studio)
- STUDIO_MODEL_* (individual fine-tuned model UUIDs)
2) Download kubeconfig from IONOS
IONOS Console → Containers → Managed Kubernetes → open your cluster → Cluster Settings → Download kubeconfig.yaml.
Screenshot (where to download kubeconfig in Kubernetes Manager):
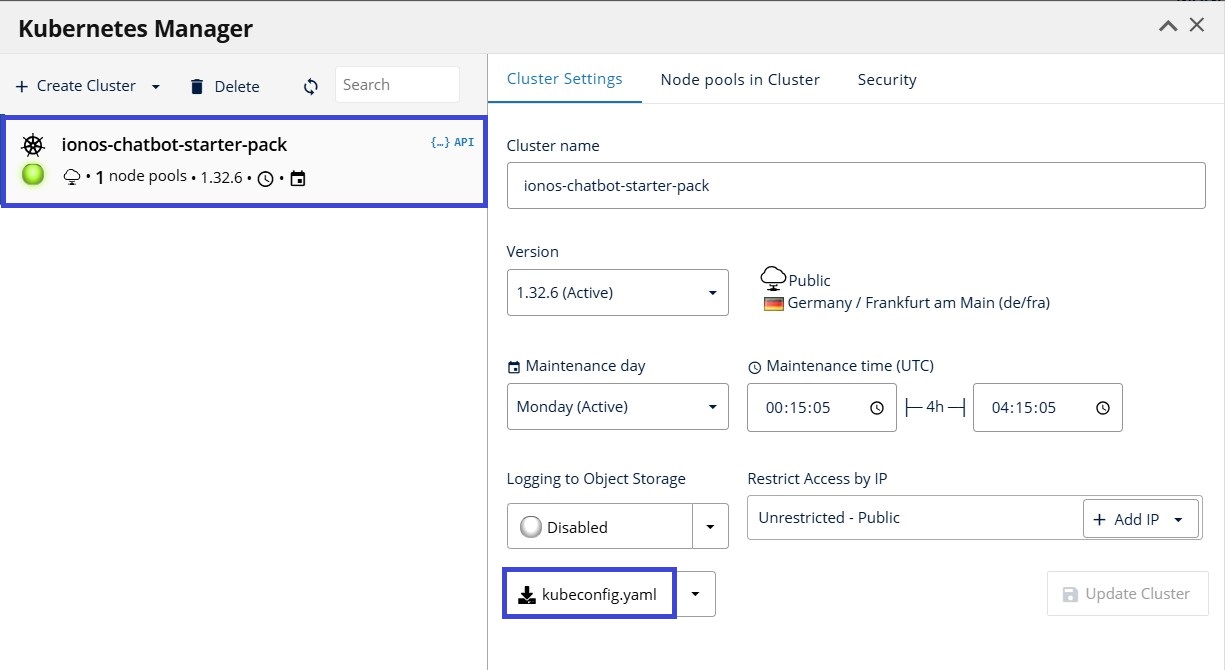
Move the downloaded kubeconfig.yaml file into your repository root (for example, drag it from your Downloads folder into the project’s top-level folder).
From your terminal, verify cluster connectivity:
kubectl cluster-info
kubectl get nodes
You should see at least one Ready node.
Note: This kubeconfig file is the one you will paste into the KUBE_CONFIG GitHub secret later (see CI/CD secrets).
3) Create runtime Secret (secrets)
In your terminal, create the secrets object in the default namespace. If it already exists, recreate it:
kubectl delete secret secrets -n default --ignore-not-found

# Set your real keys (no angle brackets)
kubectl create secret generic secrets -n default \
  --from-literal=IONOS_API_KEY="YOUR_IONOS_API_KEY" \
  --from-literal=TAVILY_API_KEY="YOUR_TAVILY_API_KEY" \
  --from-literal=STUDIO_API_KEY="YOUR_STUDIO_API_KEY" \
  --from-literal=STUDIO_ORG_ID="YOUR_STUDIO_ORG_ID" \
  --from-literal=STUDIO_BASE="https://studio.ionos.de/api/v1" \
  --from-literal=STUDIO_MODEL_QWEN_GDPR="YOUR_MODEL_UUID" \
  --from-literal=STUDIO_MODEL_GRANITE_GDPR="YOUR_MODEL_UUID"
  # Add more STUDIO_MODEL_* as needed
Now check that the secret exists and includes all keys:
kubectl get secret secrets -n default
kubectl get secret secrets -n default -o jsonpath='{.data}' | jq
When adding new env vars: Delete secret, recreate with ALL vars, then kubectl rollout restart deployments.
Later verification inside running Pods After rollout, you can confirm the app sees the env vars:
# streamlit
SPOD=$(kubectl get pods -n default -l app=streamlit -o jsonpath='{.items[0].metadata.name}')
kubectl exec -n default "$SPOD" -- env | grep -E 'IONOS|TAVILY|OPENAI|BASE_URL' || true

# backend
BPOD=$(kubectl get pods -n default -l app=backend -o jsonpath='{.items[0].metadata.name}')
4) IONOS Container Registry: credentials for Kubernetes pulls
4.1 Create a registry pull secret in Kubernetes
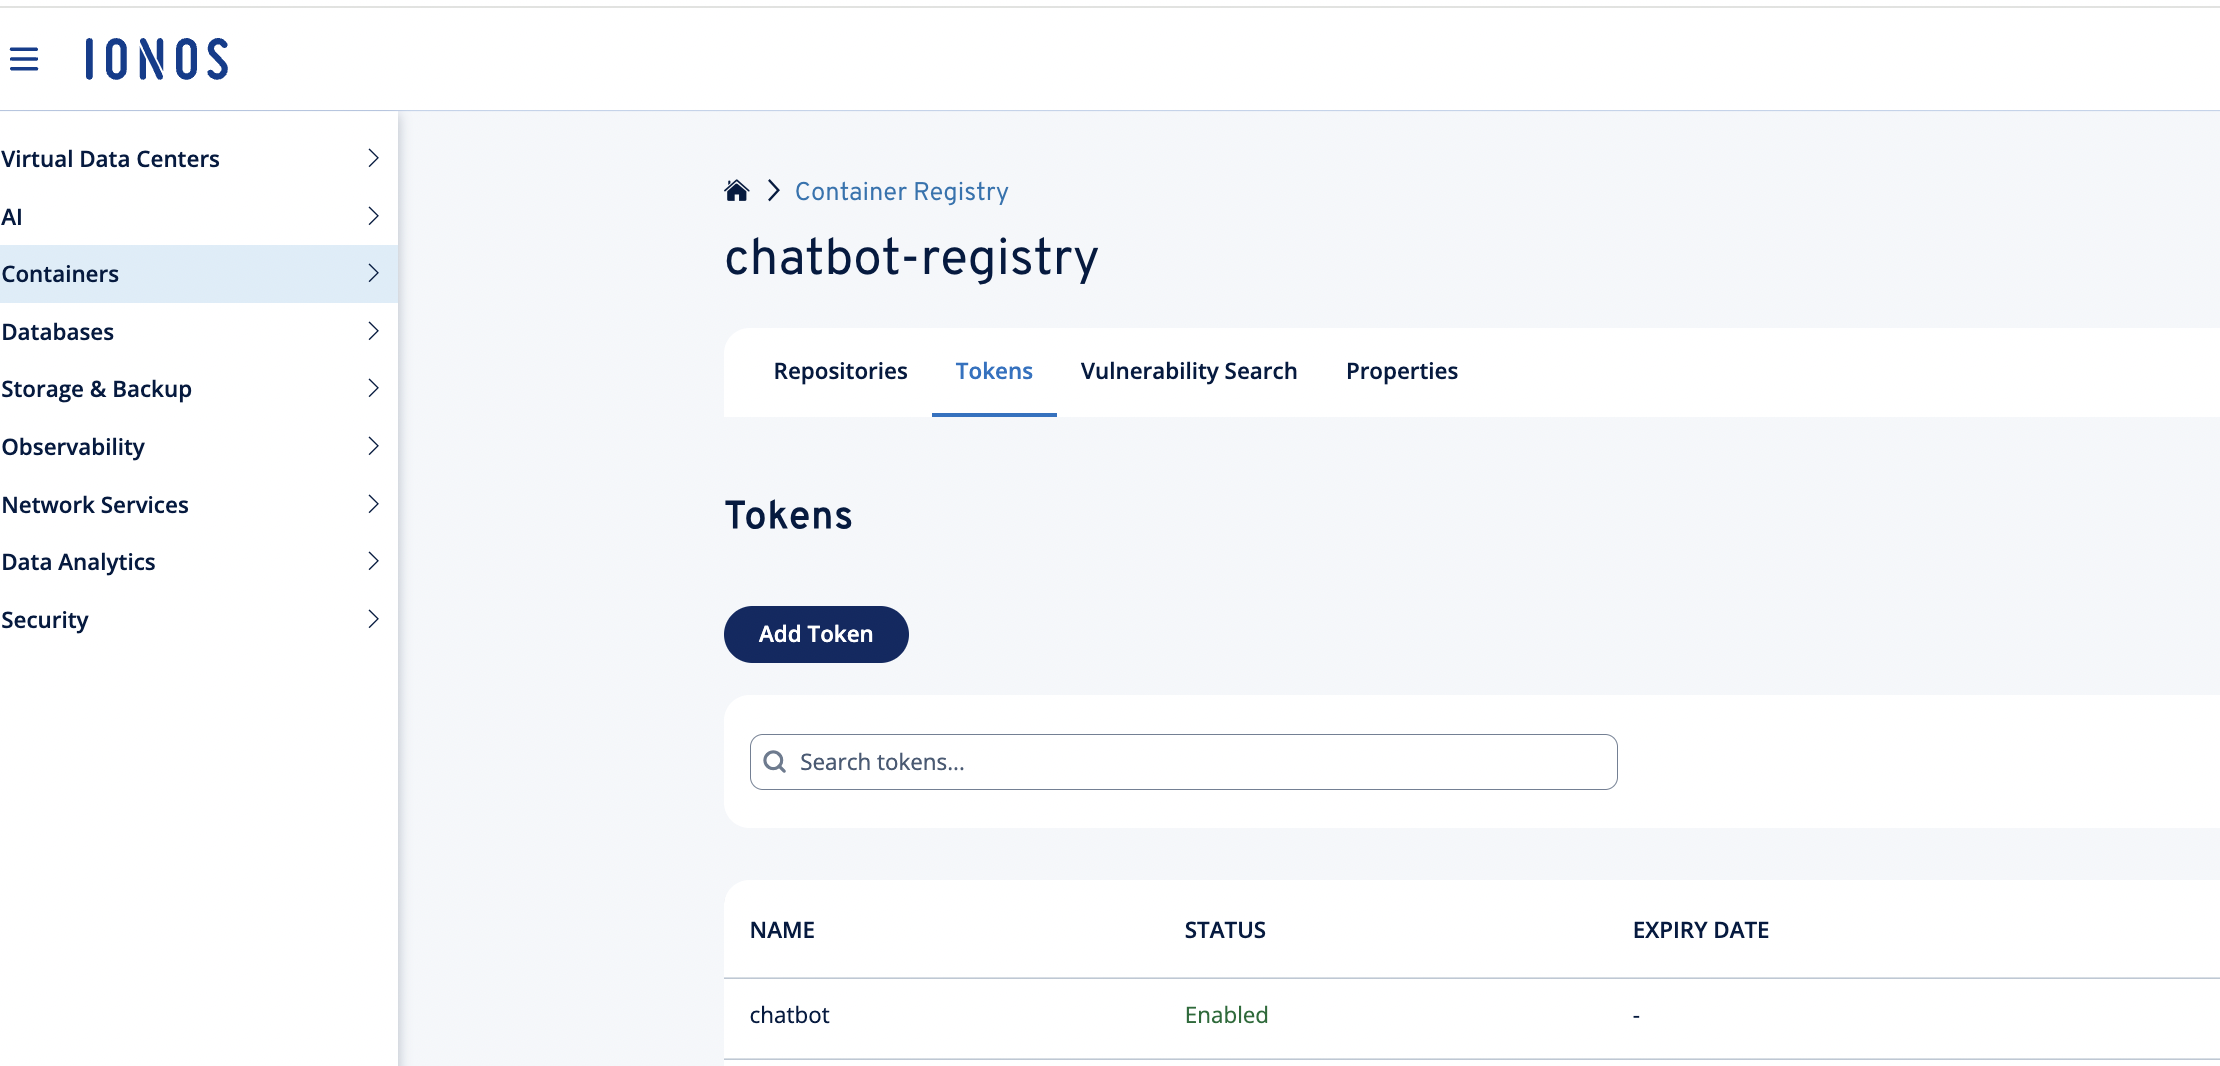
In the Container Registry, create your registry (for example, chatbot-registry) or select an existing one. Then generate an access token for your registry user (for example, chatbot).
Screenshots:
- Open Containers → Container Registry option
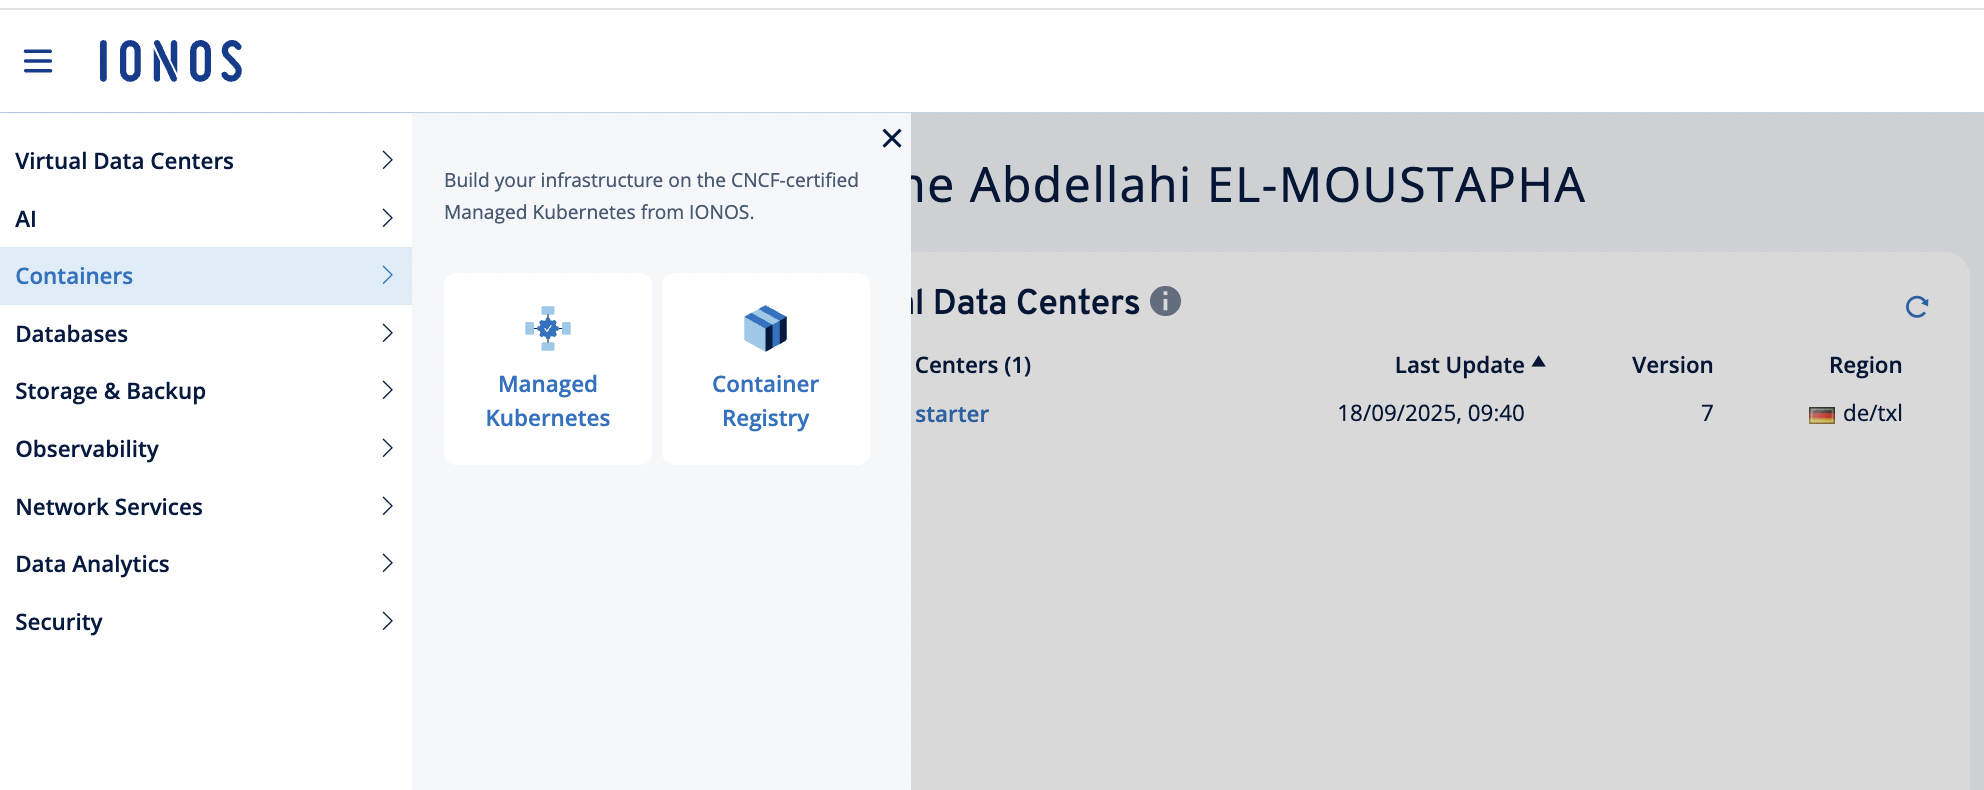
-
Create or select a registry. Example: chatbot-registry

-
Create a token. Example username: chatbot
Create the Kubernetes pull secret:
# Create docker-registry secret in K8s (namespace: default)
kubectl create secret docker-registry regcred -n default \
  --docker-server="chatbot-registry.cr.de-fra.ionos.com" \
  --docker-username="chatbot" \
  --docker-password="YOUR_IONOS_REGISTRY_ACCESS_TOKEN"
Confirm the secret was created:
kubectl get secret regcred -n default4.2 Make Deployments use the pull secret
Patch the existing deployments now (or declare this in the manifest):
kubectl patch deploy backend -n default --type merge -p \
'{"spec":{"template":{"spec":{"imagePullSecrets":[{"name":"regcred"}]}}}}'
kubectl patch deploy streamlit -n default --type merge -p \
'{"spec":{"template":{"spec":{"imagePullSecrets":[{"name":"regcred"}]}}}}'
Verify:
kubectl get deploy backend -n default -o jsonpath='{.spec.template.spec.imagePullSecrets[*].name}'; echo
kubectl get deploy streamlit -n default -o jsonpath='{.spec.template.spec.imagePullSecrets[*].name}'; echo
# expect: regcred
5) Manual Deployment
⚠️ On Apple Silicon (M1/M2/M3): Use
--platform linux/amd64or pods fail withImagePullBackOff
# Build for AMD64
docker build --platform linux/amd64 -t registry/backend:0.2.0 ./backend
docker build --platform linux/amd64 -t registry/frontend:0.2.0 ./frontends/streamlit-starter

# Push
docker push registry/backend:0.2.0 && docker push registry/frontend:0.2.0

# Deploy
kubectl set image deployment/backend backend=registry/backend:0.2.0 -n default
kubectl set image deployment/streamlit streamlit=registry/frontend:0.2.0 -n default
kubectl rollout status deployment/backend -n default
6) CI/CD with GitHub Actions (correct tags trigger build & deploy)
The workflow runs when you push a semantic tag such as 0.1.5 (NOT v0.1.5).
⚠️ Tag Format: Our CI/CD pipeline triggers on tags matching
0.x.xpattern. Do NOT usevprefix (e.g.,v0.2.0will NOT trigger the pipeline).
6.1 Required Repository Variables (Settings → Variables → Repository variables)
IMAGE_REGISTRY=chatbot-registry.cr.de-fra.ionos.com/starter-pack
6.2 Required Secrets (Settings → Secrets → Actions)
DOCKER_USERNAME= your registry username, for examplechatbotDOCKER_PASSWORD=<YOUR_IONOS_REGISTRY_ACCESS_TOKEN>KUBE_CONFIG= paste the full contents of the kubeconfig.yaml you downloaded in step 2 (do not commit this file to the repo)IONOS_API_KEY=<runtime API key>TAVILY_API_KEY=<runtime API key>STUDIO_API_KEY=<Studio API key>(if using Studio)STUDIO_ORG_ID=<Studio organization ID>(if using Studio)
6.3 Trigger a deployment
From your local repo at the commit you want to deploy:
git checkout main
git pull origin main

# ✅ Correct - triggers CI/CD
git tag 0.2.0
git push origin 0.2.0

# ❌ Wrong - won't trigger CI/CD
# git tag v0.2.0
Monitor GitHub → Actions → latest run for tag 0.2.0.
Confirm the cluster is running the new tag:
kubectl get deploy backend   -n default -o jsonpath='{.spec.template.spec.containers[0].image}'; echo
kubectl get deploy streamlit -n default -o jsonpath='{.spec.template.spec.containers[0].image}'; echo
# expect:
# chatbot-registry.cr.de-fra.ionos.com/starter-pack/backend:0.2.0
# chatbot-registry.cr.de-fra.ionos.com/starter-pack/frontend:0.2.0
7) Services & endpoints
List service external IPs:
kubectl get svc -n default
# Example:
# NAME                TYPE           EXTERNAL-IP       PORT(S)
# backend-service     LoadBalancer   212.132.123.219   8000:32425/TCP
# streamlit-service   LoadBalancer   85.215.220.90     8501:32728/TCP
Open:
- Backend: http://<backend EXTERNAL-IP>:8000
- Frontend: http://<streamlit EXTERNAL-IP>:8501
8) Verification Checklist
Confirm deployment is successful:
- ✅
kubectl get deploy -Ashows backend and streamlit AVAILABLE=1 - ✅
kubectl get svc -n defaultshows EXTERNAL-IP for both services - ✅
kubectl get deploy ... -o jsonpath='{.spec.template.spec.containers[0].image}'shows your new tag (e.g.,:0.2.0) - ✅
kubectl exec ... -- envin both pods shows IONOS_API_KEY, TAVILY_API_KEY, and STUDIO_* variables (if applicable) - ✅ Frontend is accessible and can select both “IONOS Model Hub” and “IONOS Studio” model sources
- ✅ Pods are running without
ImagePullBackOfforCrashLoopBackOfferrors
9) Common Issues
ImagePullBackOff → Rebuild with --platform linux/amd64 (Apple Silicon)
Secrets not updating → kubectl rollout restart deployment/backend -n default
CI/CD not triggering → Use 0.2.0 not v0.2.0 tag format
Studio 401 errors → Check STUDIO_API_KEY and STUDIO_ORG_ID in secrets
Debug pods → kubectl logs -l app=backend -n default --tail=50